If you have got a new iPad, let's say iPad 2, and you want to transfer all your movie collections from the old iPad to the new one, what will you do? Or if you want to share some interesting videos from your iPad to your friends' iPad, which transferring tool will you turn to?
Here I will recommend a third-party iPad transferring software – iPad Transfer Platinum, which owns powerful transferring functions to help you transfer videos between different iPad devices and even from iPad to iPhone and iPod touch.
With this wonderful and professional iPad to iPad Transfer, you can easily share movies with your friends on iPad. Now follow this step-by-step guide to learn how to transfer iPad movies to a new iPad.
Step 1: Free download iPad Transfer Platinum
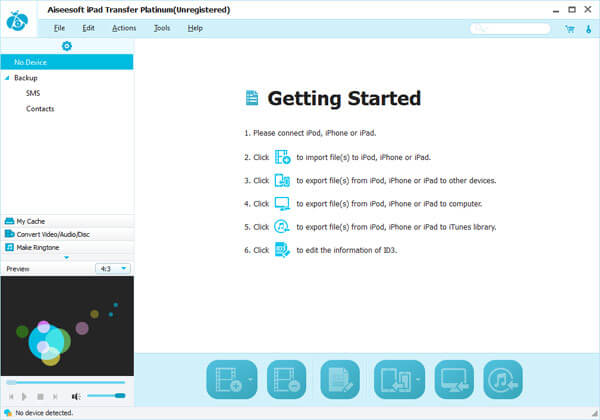
First, you need to free download the trial version of the iPad Transfer Platinum and install it on your computer. Then you can run the application. Here is the software interface without iPad info below.
Step 2: Locate the iPad files you want to transfer
Then you can connect your iPad to the computer via Dock Connector to USB Cable. Then our iPad transferring software will recognize the iPad immediately and show all information of the device on the interface.
Also our iPad transferring application will show various iPad files in different types in the left list on the software interface. Then you can choose the "Movies" library and all movies information stored on your iPad will be shown. And you can select the movie(s) that you want to transfer by selecting the checkbox ahead of the movie name.
Step 3: Choose the target iPad and start to transfer
Now you can click the "Transfer files from device to device" button to transfer all selected movies to the target iPad. Then you can enjoy the movies on your new iPad or your friend can watch the movie on the iPad.
iPad Transfer is the best assistant for iPad users. It allows you to transfer music, movie, pictures, TV shows, Podcast, iTunes U, eBooks, Camera Roll, voice memos, camera shot from iPad to computer, transfer music, video, ePub, PDF, image files from computer to iPad. Even it allows you to convert Blu-ray, DVD, video and audio to iPad formats, then output those files to iPad directly.
iPad Transfer is the best assistant for iPad users. It allows you to transfer music, movie, pictures, TV shows, Podcast, iTunes U, eBooks, Camera Roll, voice memos, camera shot from iPad to computer, transfer music, video, ePub, PDF, image files from computer to iPad. Even it allows you to convert Blu-ray, DVD, video to iPad formats, then output those files to iPad directly.
iPad Transfer provides the greatest solution for you to manage your iPad. With this iPad Transfer, what you need to do is just connect your iPad to PC and click your mouse. All the transfer or conversion process can be finished in a short while. This iPad Transfer supports iPhone 4, iPad 2 and iOS 4.3.
Best DVD Ripper
2011年9月29日星期四
2011年9月26日星期一
How to Put DVD/Video on iPod, PSP, Computer, Zune, Xbox (Mac/Windows)
Many Mac users have iPod, PSP and other portable devices, but they can only enjoy songs and videos from iTunes or buy them from internet, because there is seldom nice Mac DVD and Video covnerter for iPod, PSP and other devices. Today I will introduce you an excellent DVD/Video converter for Mac: Aiseesoft DVD Converter for Mac It allows you to put your own DVDs and you own videos on your iPod, PSP, Mac Computer and other players on Mac.
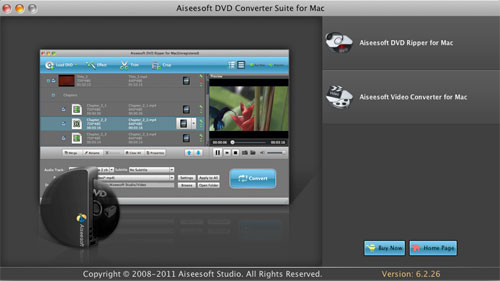
This article aims to show you how to put your DVDs and videos on your iPod, PSP, Computer, Zune, Xbox and other players for Mac users.
Part 1. Convert DVD for Mac with Aiseesoft DVD Ripper for Mac
Step 1. Load DVD
Insert DVD into your DVD-ROM, run DVD Ripper for Mac, click “Load DVD”, find the DVD folder of the movie you want to add from your DVD-ROM, and Click “Open”.
Step 2. Set output format.
This best DVD ripper for Mac provides you output formats as many as you want. Just choose one from the drop down list “profile” according to your portable player.
If you are very professional with your player, you can also set your output parameter values such as Resolution, Frame Rate, Bitrate and Sample Rate and so on.
Tips:
1. Trim:
If you want to rip only a part of the DVD movie, please click “Trim” button and drag the “Start trim slider” to set the start time and “End trim slider” to set the end time. (a). You can also do that by clicking the “Start trim button” and “End trim button”(b). The third way you do that is set the exact Start/End time at the right of the pop-up window and click “OK”.
2. Crop:
If you want to remove the black edges or you want to rip a certain area of your video, please click the “Crop” button. You can do this either by drag the frame around the movie (a) or set the crop value: “Top, Left, Bottom, Right”.(b). Another way to do that is choose mode from “Crop Mode”(c).DVD Ripper for Mac also allows you to choose the output aspect ratio above the crop panel, “Keep Original, full screen, 16:9 and 4:3” are available.
3. Effect:
If you want to adjust the effect of your movie, please click the “Effect” button and a pop-up effect window will appear. It allows you to edit your movie’s effect including “Brightness, Contrast, Hue, Saturation and Volume”.
Click “Start” to begin your conversion.
Part 2. Convert videos for Mac with AiseesoftVideo Converter for Mac
Step 1. Choose “Video Converter for Mac” on the main interface.
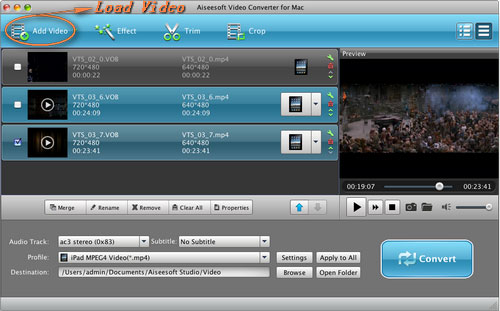
Step 2. Add video
Click “Add File” to load your video that you want to put.
Step 3. Choose output profile and settings.
You can choose your output format from the drop down list and you can set the exact values of your output videos, such as Resolution, Frame Rate and so on.
You can do the video editing as the same way of convert DVDs.
After getting your satisfying video, then click “Start” button to start your conversion.
If you are a window user, Aiseesoft DVD Converter is your best choice.
It is the perfect combination of Aiseesoft DVD Ripper, Aiseesoft Total Video Converter and Aiseesoft iPod to Computer Transfer. With this powerful DVD Converter Suite, you can easily convert DVD and video to all the popular formats: MP4, H.264, AVI, MP3, WMV, WMA, FLV, MKV, MPEG-1, MPEG-2, 3GP, 3GPP, VOB, DivX, Mov, RM, RMVB, M4A, AAC, WAV, etc
And transfer your iPod songs and videos to your computer easily.
This article aims to show you how to put your DVDs and videos on your iPod, PSP, Computer, Zune, Xbox and other players for Mac users.
Part 1. Convert DVD for Mac with Aiseesoft DVD Ripper for Mac
Step 1. Load DVD
Insert DVD into your DVD-ROM, run DVD Ripper for Mac, click “Load DVD”, find the DVD folder of the movie you want to add from your DVD-ROM, and Click “Open”.
Step 2. Set output format.
This best DVD ripper for Mac provides you output formats as many as you want. Just choose one from the drop down list “profile” according to your portable player.
If you are very professional with your player, you can also set your output parameter values such as Resolution, Frame Rate, Bitrate and Sample Rate and so on.
Tips:
1. Trim:
If you want to rip only a part of the DVD movie, please click “Trim” button and drag the “Start trim slider” to set the start time and “End trim slider” to set the end time. (a). You can also do that by clicking the “Start trim button” and “End trim button”(b). The third way you do that is set the exact Start/End time at the right of the pop-up window and click “OK”.
2. Crop:
If you want to remove the black edges or you want to rip a certain area of your video, please click the “Crop” button. You can do this either by drag the frame around the movie (a) or set the crop value: “Top, Left, Bottom, Right”.(b). Another way to do that is choose mode from “Crop Mode”(c).DVD Ripper for Mac also allows you to choose the output aspect ratio above the crop panel, “Keep Original, full screen, 16:9 and 4:3” are available.
3. Effect:
If you want to adjust the effect of your movie, please click the “Effect” button and a pop-up effect window will appear. It allows you to edit your movie’s effect including “Brightness, Contrast, Hue, Saturation and Volume”.
Click “Start” to begin your conversion.
Part 2. Convert videos for Mac with AiseesoftVideo Converter for Mac
Step 1. Choose “Video Converter for Mac” on the main interface.
Step 2. Add video
Click “Add File” to load your video that you want to put.
Step 3. Choose output profile and settings.
You can choose your output format from the drop down list and you can set the exact values of your output videos, such as Resolution, Frame Rate and so on.
You can do the video editing as the same way of convert DVDs.
After getting your satisfying video, then click “Start” button to start your conversion.
If you are a window user, Aiseesoft DVD Converter is your best choice.
It is the perfect combination of Aiseesoft DVD Ripper, Aiseesoft Total Video Converter and Aiseesoft iPod to Computer Transfer. With this powerful DVD Converter Suite, you can easily convert DVD and video to all the popular formats: MP4, H.264, AVI, MP3, WMV, WMA, FLV, MKV, MPEG-1, MPEG-2, 3GP, 3GPP, VOB, DivX, Mov, RM, RMVB, M4A, AAC, WAV, etc
And transfer your iPod songs and videos to your computer easily.
2011年9月25日星期日
Aiseesoft Releases iPad Transfer Platinum: Best iPad Assistant Tool
To provide users with the best iPad assistant software, Aiseesoft releases a professional iPad Transfer Platinum. This powerful iPad transferring software can meet nearly all needs of iPad users, such as transferring all types of files, and converting Blu-ray/DVD/video files to iPad, etc.
Compared with the standard edition of Aiseesoft iPad Transfer, this iPad Transfer Platinum supports more document types. It can help customers transfer music, movies, pictures, TV shows, Podcast, iTunes U, eBooks, Camera Roll, voice memos, camera shot from iPad to computer. Also this software is able to import music, video, ePub, PDF, image files from computer to iPad. What's more, this amazing transferring software supports transferring these files between iOS devices. For instance, users can transfer favorite songs from iPad to iPhone or iPod for enjoyment.
This professional iPad Transfer Platinum can also act as the iPad converting software. It can convert Blu-ray (BD), DVD, and videos to iPad compatible video/audio formats. And the powerful video editing features allow users to trim video segment and convert it to iPad, crop video frame, add any watermark to video, adjust video effect, and so on. And this iPad Transfer Platinum has adopted the AMD APP and NVIDIA® CUDA™ GPU acceleration technology, which can bring much higher converting speed while converting files to iPad on computer with the CUDA-enabled or AMD APP-enables GPU.
Plus, this iPad Transfer Platinum supports all Apple iOS devices (iPad, iPhone and iPod). For iPhone users, this software can backup iPhone SMS and Contacts to computer, and create iPhone M4R ringtones with any video, audio and DVD source.
In a word, Aiseesoft iPad Transfer Platinum is definitely the best and most powerful assistant tool for iOS devices. It can help iPad users convert BD/DVD/video to iPad and transfer all files between iPad and computer.
System Requirements
OS Supported: Windows NT4/2000/2003/XP and Windows Vista, Windows 7
Hardware Requirements: 800MHz Intel or AMD CPU, or above; 512MB RAM or more
2011年9月24日星期六
How to transfer iPad movies to a new iPad?
If you have got a new iPad, let's say iPad 2, and you want to transfer all your movie collections from the old iPad to the new one, what will you do? Or if you want to share some interesting videos from your iPad to your friends' iPad, which transferring tool will you turn to?
Here I will recommend a third-party iPad transferring software – Aiseesoft iPad Transfer Platinum, which owns powerful transferring functions to help you transfer videos between different iPad devices and even from iPad to iPhone and iPod touch.
With this wonderful and professional iPad to iPad Transfer, you can easily share movies with your friends on iPad. Now follow this step-by-step guide to learn how to transfer iPad movies to a new iPad.
Step 1: Free download iPad Transfer Platinum
First, you need to free download the trial version of the iPad Transfer Platinum and install it on your computer. Then you can run the application. Here is the software interface without iPad info below.
Step 2: Locate the iPad files you want to transfer
Then you can connect your iPad to the computer via Dock Connector to USB Cable. Then our iPad transferring software will recognize the iPad immediately and show all information of the device on the interface.
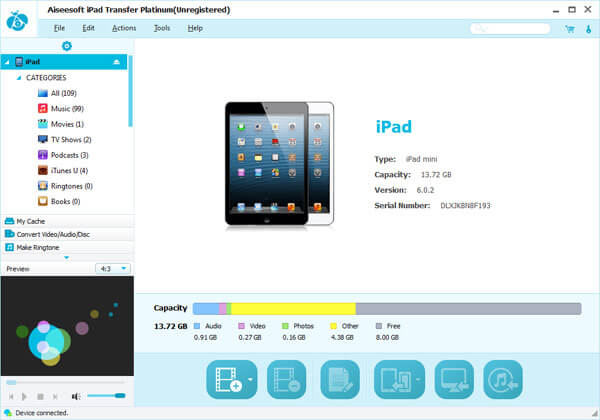
Also our iPad transferring application will show various iPad files in different types in the left list on the software interface. Then you can choose the "Movies" library and all movies information stored on your iPad will be shown. And you can select the movie(s) that you want to transfer by selecting the checkbox ahead of the movie name.
Step 3: Choose the target iPad and start to transfer
Now you can click the "Transfer files from device to device" button to transfer all selected movies to the target iPad. Then you can enjoy the movies on your new iPad or your friend can watch the movie on the iPad.
2011年9月22日星期四
Aiseesoft's Newly Updated DVD Converter Suite Supports More Portable Devices
Recently, many wonderful tablet computers and smartphones, especially some Android devices, have come into the market and are rapidly gaining in popularity. So to help these portable device users have a wonderful experience enjoying videos, Aiseesoft has decided to update their .
After the update, this professional DVD Converter Suite is able to convert all popular video files and rip DVD to nearly all video and audio formats, like MP4, H.264, AVI, WMV, FLV, MKV, 3GP, VOB, DivX, MOV, M4A, AAC, WAV, MP3, etc. And you can define your own output video/audio format supported by your portable devices. Now, this DVD Converter Suite supports iPad (iPad 2), iPhone (iPhone 4), iPod, BlackBerry (PlayBook), Android phones (HTC, Motorola, Sony Ericsson, etc.), tablet computer (Xoom, Galaxy Tab, LG G-Slate, etc.), and other popular portable devices.
Aiseesoft DVD Converter Suite is packed with Total Video Converter, DVD Ripper and iPod to Computer Transfer. Both the Total Video Converter and DVD Ripper own powerful video editing features. For instance, you can crop video frame, watermark video, cut off any segment from video/DVD source, join videos together and so on. With it, you can get a personalized output video. The built-in iPod to Computer Transfer is a powerful file transferring software to transfer iPod/iPhone/iPad movie, music and image files to computer for backup.
In summary, Aiseesoft DVD Converter Suite is specially optimized for the up-to-date portable devices. It can convert DVD and video files to popular video formats and transfer video/audio/photo from iPod to computer.
Apart from the all-in-one DVD Converter Suite, Aiseesoft specially prepares the iPad 2 assistant software, such as iPad 2 Video Converter and DVD to iPad 2 Converter for iPad 2 users. You can download the easy-to-use and reliable DVD video converter software free and have a try.
System Requirements
OS Supported: Windows NT4/2000/2003/XP and Windows Vista, Windows 7
Hardware Requirements: 800MHz Intel or AMD CPU, or above; 512MB RAM or more
2011年9月21日星期三
How to Copy DVD/ISO image/DVD Folder to DVD/ISO image/DVD Folder for Windows/Mac
When you have bunches of DVD movies, it is really hard to take care of them. The disc is really easy to break. So make a copy of your DVD movies to another DVD disc or ISO image or DVD Folder. How?
When you have bunches of DVD movies, your friends must come and borrow your movies to watch. How to protect your movie disc from being broken? Borrow them a copy?
How?
When your family have a party and it is really sweet, everyone wants to have a copy of the party's video. But they make only one DVD of it. How to make everyone has the record of the happy time? Copy the DVD.
How?
These problems are easy to solve now, if you have this powerful DVD Copy Software.
It can help you to make copys of your DVD. If you want to backup your DVD movies, you can choose to copy the full disc or the main movie. It can also copy a DVD to ISO image and DVD Folder on your computer. Also it can copy your ISO image or DVD Folder to a DVD disc to play in DVD player.
Here is a simple guide for you to follow:
For Windows users:
Step 1 Choose Source:
The source of this DVD copy software can be:
1: DVD disc
2: ISO image
3: DVD Folder
Tip 1: The specific information of the DVD disc will be shown on the top-left of the interface.
Step 2. Preparation
Before you click the “Start” button,
1. You can choose to copy the full disc or the main movie.
2. You can choose the audio, subtitle of the copy.
3. You can change the name of the volume.
4. You can choose to “include menu” or “skip menu” or neither of them.
Step 3. Choose Target:
You can save your DVD movie as:
1: DVD disc
2: DVD Folder
3: ISO Image File
Step 4: Start Copy
Click “Start” button to start the copy.
Tip 2:
You can change the “Preference”, when you click “Edit” button.
For Mac users:
This DVD Copy for Mac software is the best DVD copy for Mac users.
Let's begin to copy DVDs:
Step 1: Download and install DVD Copy for Mac
Step 2: Load Your Source
This excellent DVD copy for Mac allows you to load DVD folder and DVD image ISO.
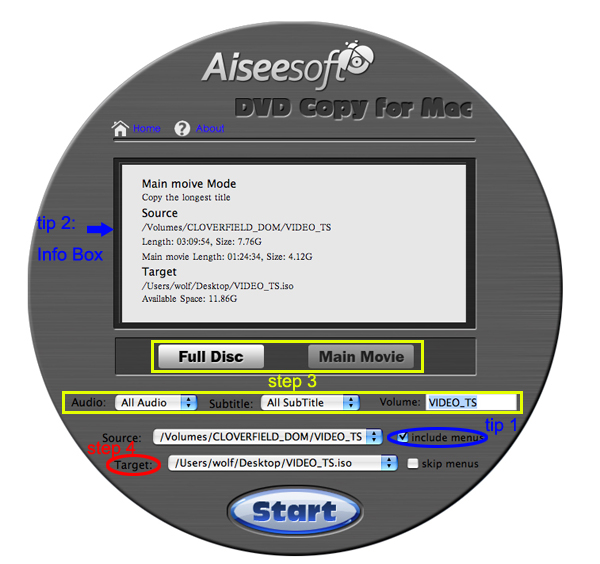
Step 3: Choose Output Info
1. “Full Disc” or “Main Movie”
This DVD copy for Mac enables you to copy the full disc and also the main movie according to your need.
2. “Audio”, “Subtitle” and “Volume” name
You can choose your output audio from the “Audio” drop-down list, such as “all audio”/ “None”/ or some audio the DVD provide.
Subtitle is always an important thing, you can choose your output subtitle in “Subtitle” drop-down list.
You can also name your output volume's name
Step 4: Choose Your Target
You can copy your DVD to another DVD disc, DVD folder or DVD image ISO.
Tips:
1. You can also choose to copy the menus or not.
2. All the info you choose will be displayed on the “Info Box”.
When you have bunches of DVD movies, your friends must come and borrow your movies to watch. How to protect your movie disc from being broken? Borrow them a copy?
How?
When your family have a party and it is really sweet, everyone wants to have a copy of the party's video. But they make only one DVD of it. How to make everyone has the record of the happy time? Copy the DVD.
How?
These problems are easy to solve now, if you have this powerful DVD Copy Software.
It can help you to make copys of your DVD. If you want to backup your DVD movies, you can choose to copy the full disc or the main movie. It can also copy a DVD to ISO image and DVD Folder on your computer. Also it can copy your ISO image or DVD Folder to a DVD disc to play in DVD player.
Here is a simple guide for you to follow:
For Windows users:
Step 1 Choose Source:
The source of this DVD copy software can be:
1: DVD disc
2: ISO image
3: DVD Folder
Tip 1: The specific information of the DVD disc will be shown on the top-left of the interface.
Step 2. Preparation
Before you click the “Start” button,
1. You can choose to copy the full disc or the main movie.
2. You can choose the audio, subtitle of the copy.
3. You can change the name of the volume.
4. You can choose to “include menu” or “skip menu” or neither of them.
Step 3. Choose Target:
You can save your DVD movie as:
1: DVD disc
2: DVD Folder
3: ISO Image File
Step 4: Start Copy
Click “Start” button to start the copy.
Tip 2:
You can change the “Preference”, when you click “Edit” button.
For Mac users:
This DVD Copy for Mac software is the best DVD copy for Mac users.
Let's begin to copy DVDs:
Step 1: Download and install DVD Copy for Mac
Step 2: Load Your Source
This excellent DVD copy for Mac allows you to load DVD folder and DVD image ISO.
Step 3: Choose Output Info
1. “Full Disc” or “Main Movie”
This DVD copy for Mac enables you to copy the full disc and also the main movie according to your need.
2. “Audio”, “Subtitle” and “Volume” name
You can choose your output audio from the “Audio” drop-down list, such as “all audio”/ “None”/ or some audio the DVD provide.
Subtitle is always an important thing, you can choose your output subtitle in “Subtitle” drop-down list.
You can also name your output volume's name
Step 4: Choose Your Target
You can copy your DVD to another DVD disc, DVD folder or DVD image ISO.
Tips:
1. You can also choose to copy the menus or not.
2. All the info you choose will be displayed on the “Info Box”.
2011年9月20日星期二
Full Guide: How to Convert DVD to MP4, AVI, 3GP, iPod ......
DVD is the first choice for many people when they want to watch movies at home. It has high quality picture, different subtitles and audio tracks and most important, some of the DVD movies are more enjoyable than than the cinema one.
However, when we travel, when the disc is broken, when we want to backup the DVD movies, when we want to share the movies with friends, when we want to make usage of the movie, what should we do?
Convert DVD to video video formats you need.
This guide aims to show you how to convert DVD to different video format both for windows/mac users.
Part 1: How to Convert DVD on Windows with DVD Ripper
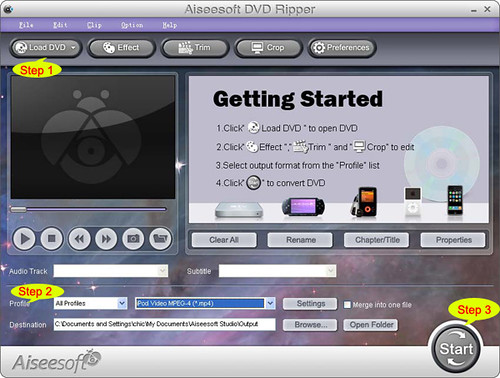
Step 1: Load DVD
Put your DVD to your DVD Drive and click “Load DVD” button to add your DVD
Step 2: Choose Profile
Choose your output video profile from a drop-down list.
Step 3: Start Conversion
Part 2: How to Convert DVD on Mac with DVD Ripper for Mac

Step 1: Load DVD
Click the “Load DVD” button, find the DVD folder of the movie you want to add from your DVD-ROM, and Click “Open”.
Step 2: Choose output profile and settings
Selecting output format is really easy, you can chose your output format according to your devices players and the default setting works great.
For a veteran of digital player, you could customize your own settings by clicking “Settings” button to chose your own video resolution, frame rate, bit rate, encoder, etc.
Step 3: Start Conversion
If you want to convert both DVD and videos, here is a really powerful DVD Converter Suite . It can help you to convert DVD and videos easily. It can also help you to backup the iPod music and videos to your computer.
However, when we travel, when the disc is broken, when we want to backup the DVD movies, when we want to share the movies with friends, when we want to make usage of the movie, what should we do?
Convert DVD to video video formats you need.
This guide aims to show you how to convert DVD to different video format both for windows/mac users.
Part 1: How to Convert DVD on Windows with DVD Ripper
Step 1: Load DVD
Put your DVD to your DVD Drive and click “Load DVD” button to add your DVD
Step 2: Choose Profile
Choose your output video profile from a drop-down list.
Step 3: Start Conversion
Part 2: How to Convert DVD on Mac with DVD Ripper for Mac
Step 1: Load DVD
Click the “Load DVD” button, find the DVD folder of the movie you want to add from your DVD-ROM, and Click “Open”.
Step 2: Choose output profile and settings
Selecting output format is really easy, you can chose your output format according to your devices players and the default setting works great.
For a veteran of digital player, you could customize your own settings by clicking “Settings” button to chose your own video resolution, frame rate, bit rate, encoder, etc.
Step 3: Start Conversion
If you want to convert both DVD and videos, here is a really powerful DVD Converter Suite . It can help you to convert DVD and videos easily. It can also help you to backup the iPod music and videos to your computer.
2011年9月19日星期一
Aiseesoft Updates Blu-ray Ripper for Mac to Support WD TV Media Player
WD TV Live and WD TV Live Plus media player enables users to enjoy 1080p HD movies on a home theater system in comfort. The two media players support a wide variety of video and audio files. However, if you are a Mac user and want to enjoy Blu-ray movies with WD TV Live and WD TV Live Plus at 1080p, you need the help of a professional Blu-ray to WD TV Ripper for Mac OS.
Now Aiseesoft Blu-ray Ripper for Mac gets updates to support both WD TV Live and WD TV Live Plus. This Mac Blu-ray Ripper can remove any Blu-ray copy protection and rip the BD to most popular video, HD video and audio formats supported by WD TV media player. And this software can provide users with perfect output quality and amazing converting speed.
To help users get a customized output video, this software enables users to edit video effect with strong video editing functions. For instance, you can trim a specified Blu-ray clip and rip it to WD TV, crop video frame, add a watermark to the Blu-ray movie, modify video brightness/saturation/contrast and join different Blu-ray playlists together.
With Aiseesoft Blu-ray Ripper for Mac, users can conveniently enjoy any Blu-ray movie on your widescreen TV with WD TV.
System Requirements
Processor: PowerPC® G4/G5 or Intel® processor
OS Supported: Mac OS X v10.4 - 10.6
Hardware Requirements: 512MB RAM, Super VGA (800×600) resolution, 16-bit graphics card or higher.
2011年9月18日星期日
Aiseesoft Releases iPad Transfer Platinum
In order to provide users with a much more powerful iPad assistant tool, Aiseesoft bring users a bran-new iPad transferring software – Aiseesoft iPad Transfer Platinum. It has got fully upgrades compare with the standard version of iPad Transfer, and it can meet nearly all needs of iPad users.

This iPad transferring software is actually a combination of iPad converter and iPad transfer. It can help you convert Blu-ray, DVD, video and audio files to iPad compatible formats and transfer nearly all iPad files between iPad and computer. Even it allows you to make your own iPhone ringtones with source video and DVD movies.
This professional iPad Transfer Platinum can help customers transfer music, movies, pictures, TV shows, Podcast, iTunes U, eBooks, Camera Roll, voice memos, camera shot from iPad to computer, and import music, video, ePub, PDF, image files from computer to iPad.
Also if you just bought a new iOS device (iPad, iPhone or iPod) and want to transfer files from the old device to the new one, this transferring software can also realize this function.
As a professional iPad Converter, this software is able to convert almost all Blu-ray movies, DVD and video files to iPad MP4, MOV, M4V, H.264, etc. video with perfect output video quality. Also it owns powerful video editing features. For instance, you can cut off any video segment from your source video and convert it to iPad. Also you can crop video frame and add watermark to your video. What’s more, this software supports adjusting video brightness, saturation, contrast, hue and contrast. So you can definitely create the prefect iPad video with this iPad Transfer Platinum.
Also Aiseesoft prepares other platinum versions of the transferring software, like iPad 2 Transfer Platinum, iPhone Transfer Platinum, iPhone 4 Transfer Platinum, and iPod Transfer Platinum.
2011年9月15日星期四
Aiseesoft Updates iPad Transferring Software for Mac for the iPad 2 and iOS 4.3
Since the arrival of iPad 2, Aiseesoft has noticed the great demand among our customers for iPad 2 transferring tools. Apart from releasing the specialized iPad 2 to Mac Transfer and iPad 2 Manager for Mac, we also updated our existing iPad to Mac Transfer and iPad Manager for Mac to support the latest iPad 2.
Aiseesoft iPad to Mac Transfer can help you realize some useful tasks that the iTunes cannot do. For example, it allows you to transfer iPad movies, music and images to local disk on Mac. Also you can copy these iPad files to iTunes for backup.
Aiseesoft iPad Manager for Mac is a two-way transfer with greater transferring features. Besides copying iPad music, songs and photos to Mac and iTunes, this Mac iPad Transfer also supports adding local files to iPad and iPad 2. Moreover, this iPad Manager for Mac can convert your DVD and video/audio files to iPad (iPad 2) compatible video and audio formats. You can also import the converted files to iPad directly.
Both of the two transferring tools can work perfectly with the latest iOS 4.3, and the intuitive interface can make all operations of the software much easier.
System Requirements
Processor: Intel® processor
OS Supported: Mac OS X v10.4 - 10.6
Hardware Requirements: 512MB RAM, Super VGA (800×600) resolution, 16-bit graphics card or higher.
2011年9月13日星期二
Aiseesoft DVD Ripper for Mac - Helping Users Enjoy DVD Video on iPad 2
With the diversity of video formats, converting DVD to other formats has become an essential requirement of most multimedia users. Plus, since iPad 2 only supports MPEG-4, H.264/MPEG-4 AVC, MOV, M4V video formats and AAC, MP3, WAV, AIFF, M4A audio formats, it is impossible for iPad 2 users to play DVD movies on iPad 2. Now, the newly-updated best DVD Ripper for Mac will be their best choice to solve the problem.
Aiseesoft DVD Ripper for Mac is powerful software and very easy to use, which can rip DVD to popular video or audio such as MPEG-4, H.264/MPEG-4 AVC, MOV, M4V and AAC, MP3, WAV, AIFF, M4A to satisfy iPad 2. This best DVD Ripper for Mac also provides a wealth of conversion programs for the iPod, iPhone, PSP, Zune, Apple TV and other digital devices, so that you can easily convert DVD to formats which these devices support.
The best DVD Ripper for Mac provides video editing functions which make your conversion more flexible. With this best DVD Ripper for Mac, you can clip video segments, crop video size, edit video effects and add watermarks.
This Aiseesoft DVD Ripper for Mac deserves to be the best DVD Ripper software for Mac users:
1.
DVD video conversion
Rip DVD to AVI, MPEG, MPG, WMV, DivX, XviD, RM, MOV, FLV, 3GP, 3GP2, MP4, HD MP4, TS video formats.
2.
DVD audio extraction
The best DVD Ripper for Mac can extract DVD audio and convert it into various audio formats such as MP3, WAV, WMA, AAC, AC3, AAC, AIFF, AMR, AU, FLAC, MP2, OGG audio formats.
3.
Capture video image
With this best DVD Ripper for Mac, you can use any DVD video clips in a fixed time to crawl down the screen.
4.
Edit video effects
This DVD Ripper for Mac provides a powerful video editing function which allows you to crop video, adjust video subtitle, edit video effects, add video watermark.
5.
Merge files into one
This Mac DVD ripper allows you to put two or more files you choose into one output file.
Overall, the best DVD Ripper can meet the needs of you, so that you can get a perfect experience.
Overall, the best DVD Ripper can meet the needs of you, so that you can get a perfect experience.
System Requirements
Processor: Power PC ® G4/G5 or Intel ® Processor
Os Supported: Mac OS X v10.4 – 10.6
Hardware Requirements: 521MB RAM, Super VGA (800 x 600) resolution, 16 – bit graphics card or higher
Pricing and Availability
Aiseesoft DVD Ripper for Mac is available now at $35.00.
2011年9月12日星期一
Aiseesoft DVD Ripper for Mac Gets Major Update
Aiseesoft, a top-ranking Windows and Mac Blu-ray/DVD/video converting software provider, announced a major update to DVD Ripper for Mac last Friday. This new DVD Ripper for Mac brings users a large number of new wonderful features and improvements. In general, this DVD ripping software for Mac is re-developed with Qt development framework, and it supports 5.1 Dolby surround sound and the WebM output video format. Also many other special and neat changes were made.
Detailed information of the updated DVD Ripper for Mac:
- More user-friendly graphical interface
- Enhance the ability of parsing DVD
- Improve the "Merge" feature
- Support outputting video without audio track
- Support adjusting output file volume
- Renew the output profile
- Support setting output video aspect ratio
Aiseesoft DVD Ripper for Mac is professional DVD ripping software designed for Mac users. It can help users rip any DVD to popular video files, like AVI, MP4, MOV, MKV, WMV, FLV, DivX, XviD, MPEG-1/2, 3GP, VOB, HD TS, HD MTS, HD M2TS, etc. on Mac. So this wonderful software enables customers to enjoy DVD movies on any portable devices, such as iPad, iPhone, iPod touch, smartphone, PSP, Android devices, BlackBerry, etc.
Also this Mac DVD Ripper has powerful video editing features. For instance, it can help customers cut off any DVD segment and convert it to video file, crop video frame, add any text/image watermark to their video, join DVD clips together, and even adjust video brightness/saturation/contrast/hue/volume.
System Requirements
OS Supported: Mac OS X v10.4 - v10.7
Hardware Requirements: 512MB RAM, Super VGA (800×600) resolution, 16-bit graphics card or higher.
2011年9月9日星期五
How to convert FLV to iPhone?
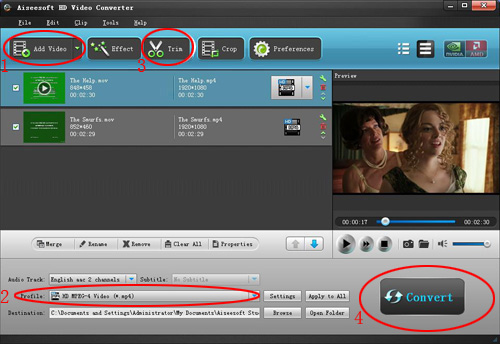
FLV (Flash Video) is widely used on the network because of its extremely small, extremely fast to load. As we all know the FLV videos are not natively supported by iPhone full series. What if you want to enjoy your download FLV video from YouTube, MySpace, Google Video, etc. to your iPhone? In this case, you need the help of a professional FLV to iPhone Converter. I recommend you Aiseesoft iPhone Movie Converter, which is the best solution to enjoy FLV video on iPhone for all iPhone users.
This FLV to iPhone Converter is able to convert any FLV video to iPhone compatible video formats. It fully supports all versions of iPhone and the latest iOS.
Step 1: Free download FLV to iPhone Converter
First, you need to free download the installation package of this FLV to iPhone Converter and install it on your computer. Then you can run this application.
Step 2: Add FLV video
Click the "Add Video" button to input the FLV sources to this FLV to iPhone Converter. Or you can just drag the FLV files to the software.
Step 3: Choose output format
To choose a proper output video format for the FLV video, you need to click on the "Profile" drop-down list and choose the "Apple iPhone > iPhone MPEG4 Video (*.mp4)". And you can click "Browse" button to select a destination folder in the dialog box that opens.

Step 4: Output settings
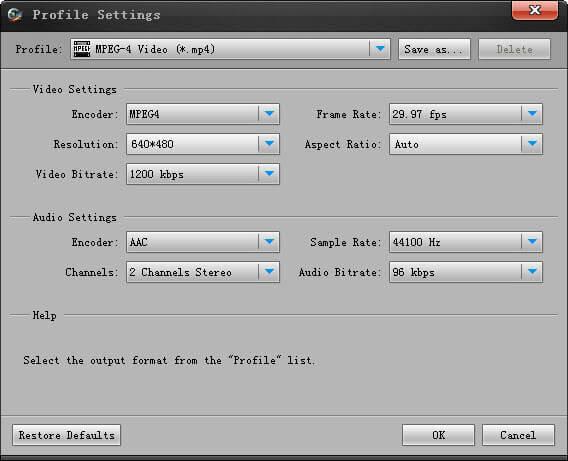
After choosing the proper output video format, you can click the "Settings" button to set output parameters, like video encoder, frame rate, video bitrate, resolution, audio encoder, sample rate, channels, audio bitrate, and aspect ratio.
Step 5: Convert FLV to iPhone
After all these settings, you can click the "Convert" button to start converting FLV video to iPhone. After the conversion is done, you can transfer the output iPhone video to iPhone and enjoy it anywhere and anytime.
Tips: this FLV to iPhone Converter owns powerful video editing features. If you want to customize output video effect, this software can help you trim video length, crop video frame, add text/image watermark to your video, and adjust video effect.
2011年9月8日星期四
How to convert and edit HD video
Because of the widely using of HD Camcorder, now it is really convenient to record family parties and other things you are interested in. Nowadays, people would like to share their things with the rest of the world through Internet, such as youtube.com and other video websites.
This guide aims to show you how to convert and edit the video you recorded using your HD camcorder
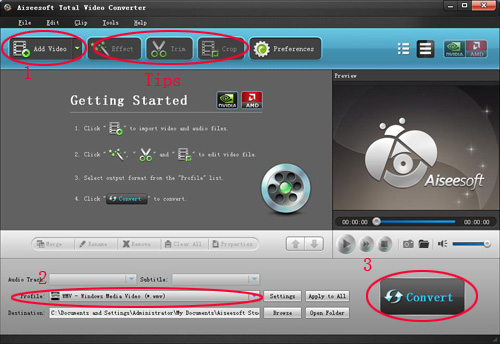
What you need is a powerful HD Video Converter.
Step 1: Load Video
Click “Add File” to load the video that you want to convert.
Step 2: Choose Your Output Profile and Settings.
From “Profile” drop-down list you can choose your output profile according to your need.
You can also click “setteing”adjust the settings of your output video, such as “video/audio encoder”, “Video/audio Bitrate”, “Channels”, “Resolution” and so on..
Step 3: Video Editing.
This powerful MTS Converter allows you to do many video editings.
1. Click "Effect". to make special effect for your movie.
You can adjust the “Brightness”, “Contrast”, “Saturation” and also you can use “deinterlacing” to improve you output effect.
2. Trim: .
“Trim” function allows you to pick up any part of your video to convert. You can just convert a part of your video that you want.
3: Crop: .
Cut off the black edges of the original movie video and watch in full screen on your iPod using the "Crop" function.
Step 4: Conversion.
After you have done all the steps above you can click “Start” button to start your conversion.
Here I also recommend you some High Definition video converter, MTS Converter, TS Video Converter.
This guide aims to show you how to convert and edit the video you recorded using your HD camcorder
What you need is a powerful HD Video Converter.
Step 1: Load Video
Click “Add File” to load the video that you want to convert.
Step 2: Choose Your Output Profile and Settings.
From “Profile” drop-down list you can choose your output profile according to your need.
You can also click “setteing”adjust the settings of your output video, such as “video/audio encoder”, “Video/audio Bitrate”, “Channels”, “Resolution” and so on..
Step 3: Video Editing.
This powerful MTS Converter allows you to do many video editings.
1. Click "Effect". to make special effect for your movie.
You can adjust the “Brightness”, “Contrast”, “Saturation” and also you can use “deinterlacing” to improve you output effect.
2. Trim: .
“Trim” function allows you to pick up any part of your video to convert. You can just convert a part of your video that you want.
3: Crop: .
Cut off the black edges of the original movie video and watch in full screen on your iPod using the "Crop" function.
Step 4: Conversion.
After you have done all the steps above you can click “Start” button to start your conversion.
Here I also recommend you some High Definition video converter, MTS Converter, TS Video Converter.
2011年9月5日星期一
How to Convert Video Files on Mac/Windows
Nowadays, people can enjoy videos in different ways, such as youtube.com and other online video websites, iPod/Zune and other portable players, and also play video on computer, and you can also make you own videos with windows movie make or iMovie for Mac users. So how to convert videos between different video formats is a big problem for both windows and Mac users. Today I will share you guys two powerful video converter for Mac and Windows users.
For Mac users, this powerful video converter for mac is really nice.
Let's use it to convert a video for Example
Step 1: Add File
Click “Add File” button to load the video you want to converter
Step 2: Choose profile and adjust settings
You can find your output video format from a drop-list called “Profile”
You can also adjust the specific settings of the output video, such as “Resolution”, “Bitrate”, “Encoder” and so on.
Step 3: Edit Video
1. Effect:
You can adjust the “Brightness”, “Contrast”, “Saturation” and “Volume”
2. Trim:
You are allowed to pick up any part of the video to convert.
3. Crop:
To remove the black edges and choose a play area to convert.
Step 4: Start Conversion
Click “Start” button to begin your conversion and you will get your video soon.
For Windows users, you need Total Video Converter.
Step 1: Load Video
You can load your videos into the converter by clicking “Add File”
Step 2: Choose output info
This converter provides you many output profiles for you to choose, you can choose your output profiles according to your need. And also you can just choose a certain video format.
You can also adjust the settings of your output profiles. You can even save a certain settings as your own output settings.
Step 3: Conversion
Click “Start” button to begin your conversion and few mins later you can get your video.
Tips: How to effect, trim and crop the video to improve your output video quality.
After your Load your video you can click “Effect” button to access the effect panel
1: Effect
Adjust the video effect as you want: Brightness, Contrast, Saturation and Deinterlacing.
2: Trim
Clip your video, pick up any part of your video to convert.
You have 3 ways to do trim:
1.Dragging the slider
2.Controlling the “Trim From” and “Trim To” button
3.Setting the Start and End time
3: Crop
Adjust video size, Cut off the black edge of your video to let you enjoy your movie in full screen by click the 'Crop' button
You have 2 ways to do crop:
1.Move your mouse cursor onto one of the eight small adjustment boxes on the cropping frame and drag the crop frame to crop the video such as cutting off top and bottom black bar. The cropped result will be shown on the Output Preview at the same time
2.Type the value directly or set the value in "Left", "Right" and "Cropped area size" area to set the position of the cropping frame.
You can also select the aspect ratio from the Zoom Mode drop-down list. There are 4 choices for you: Full Screen, 16:9, 4:3 and Keep Original.
2011年9月4日星期日
How to Rip DVD, Convert Video, Backup iPod info,Make iPhone Ringtone, Copy DVD on Mac
Two years ago, I had my first Mac. Today I get my new MacBook Pro. So I am totally a Mac fan now. I enjoy my Mac very much. I always watch movies on my Mac and sometimes rip my DVD movies on it and convert video to another format. Also I make my own iPhone ringtone on it. And recently, I copy my DVDs on it as well. Now I will share my experience with you.
My article includes 5 part:
Part 1. How to rip DVD to video format on Mac
Part 2. How to convert video on Mac
Part 3. How to transfer info between iPod and Mac
Part 4. How to make iPhone ringtone on Mac
Part 5. How to copy DVD on Mac
Before we get start, I want to introduce you a really powerful tool:
Aiseesoft DVD Software Toolkit for Mac. It can do what I said above easily.
Part 1. How to rip DVD on Mac
Just click DVD Ripper for Mac on the main interface.
Step 1. Load you DVD.
Click the “Load DVD” button(a), find the DVD folder of the movie you want to add from your DVD-ROM, and Click “Open”.

Tick the check boxes(b) before the titles and chapters that you want to rip.
Step 2. Chose output profile and settings.
Selecting output format is really easy, you can chose your output format according to your devices players and the default setting works great.
Tips: Sample rate (Hz) = any value up to 48000 (higher value = better sound quality = bigger file)
Bitrate (kbps) = any value up to 160 (higher value = better sound quality = bigger file)
After setting your own output and settings you can click “Start” button to start your conversion. (The time of the conversion depends on your DVD and the settings you chose.)
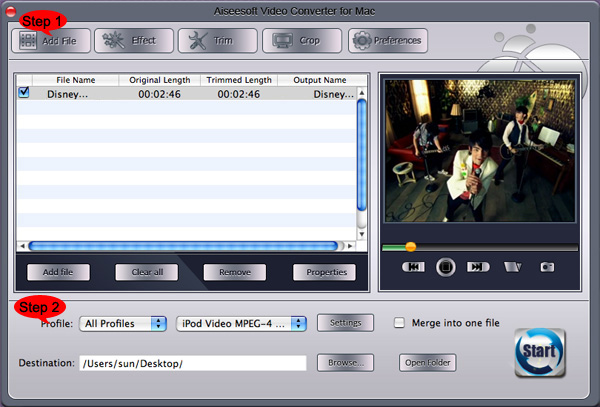
Part 2. How to convert video on Mac
Click Video Converter for Mac on the interface.
Step 1. Load video
Easily click “Add File” to load your video that you want to convert.
Step 2. Choose output profile and settings
At the bottom of the interface there are a drop-download list named “profile”. You can choose your output format here.
You can also adjust the settings of your output video, such as Resolution, Bit rate and so on.
After you finish the 2 steps, you can just click “Start” button to start your conversion.
Part 3. How to transfer info iPod and Mac
Use iPod Manager for Mac
Step 1. Plug your iPod to your Mac
Aiseesoft iPod Manager for Mac can find it automatically.
Step 2.
a. if you want to transfer music and videos from iPod to Mac
Pick up what you want to backup
Just click Music and all of your music on your iPod will be listed, so you can pick up which songs you want to transfer. (Click “Video”/“Picture”, if you want to backup your videos and image.)
Click “iPod to Mac” and find where to put your iPod info on your Mac and click “Open”
b. if you want to put music and videos from Mac to iPod.
1. Click “Music”
2. Click “Mac to iPod” and pick up the songs on your Mac you want to put on your iPod and click “Open”
(If you want to put video/image, just click “Video”/“Picture” and other operation is the same as putting songs)
Part 4. How to make iPhone ringtone on Mac
Click iPhone Ringtone Maker for Mac on the main interface.
Step 1: Click “Browse” on the right side of "Input File" to import the file that you want to make ringtone from it.
Step 2: Play it and listen the music to find the segment that you want to use it as ringtone. Then drag and click the start & end slider to set your wanted segment, or type the start & end time in the corresponding text box directly to get the exact segment. You also can pre-listen the converted audio before generate.
Step 3: Click “Browse” on the right side of "Local Output Folder" to choose the output destination.
Step 4: Check "Export to iPhone" option, the converted ringtone will be load to your iPhone directly.
[b]Step 5[/b]: After all the settings are finished, click “Generate” to begin making your own iPhone ringtone.
Key function
● Convert any video to iPhone ringtone M4R
● Create iPhone ringtone from any audio files
● Get any clips from video and audio
● Edit Added iPhone ringtones
Part 5. How to copy DVD on Mac
You need to use DVD Copy for Mac.
Step 1. Load Your Source
This excellent DVD copy for Mac allows you to load DVD folder and DVD image ISO.
Step 2. Choose Output Info
1. “Full Disc” or “Main Movie”
This DVD copy for Mac enables you to copy the full disc and also the main movie according to your need.
2. “Audio”, “Subtitle” and “Volume” name
You can choose your output audio from the “Audio” drop-down list, such as “all audio”/ “None”/ or some audio the DVD provide.
Subtitle is always an important thing, you can choose your output subtitle in “Subtitle” drop-down list.
You can also name your output volume's name
Step 3. Choose Your Target
You can copy your DVD to another DVD disc, DVD folder or DVD image ISO.
Tips:
1. You can also choose to copy the menus or not.
2. All the info you choose will be dispalyed on the “Info Box”.
My article includes 5 part:
Part 1. How to rip DVD to video format on Mac
Part 2. How to convert video on Mac
Part 3. How to transfer info between iPod and Mac
Part 4. How to make iPhone ringtone on Mac
Part 5. How to copy DVD on Mac
Before we get start, I want to introduce you a really powerful tool:
Aiseesoft DVD Software Toolkit for Mac. It can do what I said above easily.
Part 1. How to rip DVD on Mac
Just click DVD Ripper for Mac on the main interface.
Step 1. Load you DVD.
Click the “Load DVD” button(a), find the DVD folder of the movie you want to add from your DVD-ROM, and Click “Open”.
Tick the check boxes(b) before the titles and chapters that you want to rip.
Step 2. Chose output profile and settings.
Selecting output format is really easy, you can chose your output format according to your devices players and the default setting works great.
Tips: Sample rate (Hz) = any value up to 48000 (higher value = better sound quality = bigger file)
Bitrate (kbps) = any value up to 160 (higher value = better sound quality = bigger file)
After setting your own output and settings you can click “Start” button to start your conversion. (The time of the conversion depends on your DVD and the settings you chose.)
Part 2. How to convert video on Mac
Click Video Converter for Mac on the interface.
Step 1. Load video
Easily click “Add File” to load your video that you want to convert.
Step 2. Choose output profile and settings
At the bottom of the interface there are a drop-download list named “profile”. You can choose your output format here.
You can also adjust the settings of your output video, such as Resolution, Bit rate and so on.
After you finish the 2 steps, you can just click “Start” button to start your conversion.
Part 3. How to transfer info iPod and Mac
Use iPod Manager for Mac
Step 1. Plug your iPod to your Mac
Aiseesoft iPod Manager for Mac can find it automatically.
Step 2.
a. if you want to transfer music and videos from iPod to Mac
Pick up what you want to backup
Just click Music and all of your music on your iPod will be listed, so you can pick up which songs you want to transfer. (Click “Video”/“Picture”, if you want to backup your videos and image.)
Click “iPod to Mac” and find where to put your iPod info on your Mac and click “Open”
b. if you want to put music and videos from Mac to iPod.
1. Click “Music”
2. Click “Mac to iPod” and pick up the songs on your Mac you want to put on your iPod and click “Open”
(If you want to put video/image, just click “Video”/“Picture” and other operation is the same as putting songs)
Part 4. How to make iPhone ringtone on Mac
Click iPhone Ringtone Maker for Mac on the main interface.
Step 1: Click “Browse” on the right side of "Input File" to import the file that you want to make ringtone from it.
Step 2: Play it and listen the music to find the segment that you want to use it as ringtone. Then drag and click the start & end slider to set your wanted segment, or type the start & end time in the corresponding text box directly to get the exact segment. You also can pre-listen the converted audio before generate.
Step 3: Click “Browse” on the right side of "Local Output Folder" to choose the output destination.
Step 4: Check "Export to iPhone" option, the converted ringtone will be load to your iPhone directly.
[b]Step 5[/b]: After all the settings are finished, click “Generate” to begin making your own iPhone ringtone.
Key function
● Convert any video to iPhone ringtone M4R
● Create iPhone ringtone from any audio files
● Get any clips from video and audio
● Edit Added iPhone ringtones
Part 5. How to copy DVD on Mac
You need to use DVD Copy for Mac.
Step 1. Load Your Source
This excellent DVD copy for Mac allows you to load DVD folder and DVD image ISO.
Step 2. Choose Output Info
1. “Full Disc” or “Main Movie”
This DVD copy for Mac enables you to copy the full disc and also the main movie according to your need.
2. “Audio”, “Subtitle” and “Volume” name
You can choose your output audio from the “Audio” drop-down list, such as “all audio”/ “None”/ or some audio the DVD provide.
Subtitle is always an important thing, you can choose your output subtitle in “Subtitle” drop-down list.
You can also name your output volume's name
Step 3. Choose Your Target
You can copy your DVD to another DVD disc, DVD folder or DVD image ISO.
Tips:
1. You can also choose to copy the menus or not.
2. All the info you choose will be dispalyed on the “Info Box”.
订阅:
博文 (Atom)